Halloween is just around the corner, and you want your home to give everyone serious goosebumps this year. These 50 spooky halloween decoration ideas will help you transform both your indoor and outdoor spaces into a haunted masterpiece that’ll have trick-or-treaters talking all season long.
This guide is perfect for homeowners, renters, party hosts, and anyone who wants to create spine-chilling halloween home decor without breaking the bank or spending weeks crafting. You’ll discover budget-friendly indoor halloween decorations that pack a punch, plus show-stopping outdoor halloween displays that’ll make your house the neighborhood’s must-see destination.
We’ll walk you through easy halloween decorations you can whip up in under an hour, budget halloween decorations that look expensive, and DIY halloween decorations that require zero special skills. You’ll also find advanced techniques for those ready to take their halloween decoration ideas to the next level, plus genius last-minute solutions when October 31st sneaks up on you faster than expected.
Budget-Friendly Indoor Halloween Decorations That Create Maximum Impact

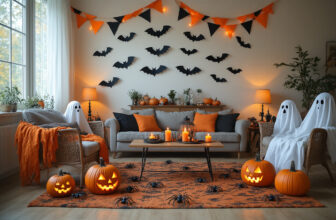
Transform Your Living Room with Creepy Cloth and String Lights
You can turn your living room into a haunted mansion using just cheesecloth and battery-operated string lights. Drape thin cheesecloth or lightweight fabric over your furniture to create ghostly silhouettes that immediately set a spooky mood. The key is layering – start with darker fabrics as your base, then add translucent materials on top for depth.
String lights work magic when you weave them through the fabric. Choose orange, purple, or flickering white LEDs to cast eerie shadows on your walls. You can create floating ghost figures by stretching cheesecloth over wire hangers and hiding string lights inside. Position these around your room at different heights for a truly haunting effect.
Your existing furniture becomes part of the Halloween decoration setup when you cover chairs with dark sheets and add glowing eyes made from battery-operated tea lights. Throw pillows can be wrapped in cobweb-printed fabric or covered with fake spider webs you can buy for just a few dollars.
Turn Everyday Household Items into Frightening Props
Your kitchen pantry and storage closets are treasure troves for DIY Halloween decorations. Empty glass jars transform into specimen containers when you fill them with colored water, plastic insects, or fake eyeballs. Add food coloring to create mysterious potions – green for witch’s brew or red for blood.
Old picture frames become portals to the underworld when you replace family photos with spooky images or mirrors with cracks drawn in washable marker. You can print scary faces online and place them behind the glass for an unsettling gallery wall.
Cardboard boxes from recent deliveries make excellent tombstones. Cut them into headstone shapes, paint them gray, and add epitaphs with black markers. Your bathroom can become a mad scientist’s lab using empty shampoo bottles filled with colored water and spooky labels.
Even your clothing can serve double duty – hang old shirts and pants from coat hangers to create the illusion of invisible people wandering your halls.
Create Spine-Chilling Wall Art Using Free Printables
The internet offers thousands of free Halloween printables that you can download and display throughout your home. You don’t need expensive frames – tape them directly to walls, doors, or windows for instant Halloween home decor. Look for vintage horror movie posters, spooky silhouettes, and creepy quotes that match your style.
Create a gallery wall of different-sized prints for maximum impact. Mix black and white images with colorful designs to add visual interest. You can even print multiple copies of the same design in different sizes to create depth.
Your printer becomes your best friend for budget halloween decorations when you discover printable Halloween bunting, door signs, and window clings. Many websites offer complete decoration packages that you can print at home for less than the cost of a single store-bought item.
Don’t forget about printable labels for your DIY potion bottles and food containers. These small details make your indoor halloween decorations look professionally coordinated without breaking your budget.
Build Haunting Centerpieces from Dollar Store Finds
Your dining table deserves a spooky makeover that costs less than a fancy dinner. Dollar stores stock everything you need to create stunning Halloween centerpieces that rival expensive store displays. Start with plastic skulls, fake ravens, and battery-operated candles as your foundation pieces.
Glass vases filled with black beans, orange candy corn, or plastic spiders create striking focal points. You can spray paint plastic pumpkins in metallic colors for an upscale look that nobody will guess came from the dollar store. Add some artificial fall leaves and twisted branches for natural texture.
Create height variations using books wrapped in dark paper as risers for your decorative elements. This technique makes your centerpiece look more expensive and professionally arranged. Small mirrors scattered around the base reflect your spooky decorations and candlelight for added drama.
Your completed centerpieces can extend beyond the dining table – create smaller versions for coffee tables, mantels, and entryway consoles to carry your Halloween theme throughout your entire home.
Outdoor Halloween Displays That Stop Traffic

Design a Graveyard Scene That Terrifies Trick-or-Treaters
Transform your front yard into a bone-chilling cemetery that makes visitors think twice before approaching your door. Start by creating weathered tombstones from foam board or cardboard, painting them with gray base coats and adding dark stains for an aged appearance. Position these outdoor halloween decorations at varying angles to simulate years of settling and decay.
Add dimension with skeleton hands emerging from the ground using plastic bones and black fabric. Scatter artificial bones and skulls throughout the area, ensuring they catch the light from your spooky decorations. Create mounds of “fresh graves” using black plastic sheeting and mulch, then top with wilted flowers or dead branches for authenticity.
Your graveyard scene becomes even more terrifying with strategically placed fog machines creating low-hanging mist. Position motion sensors near key tombstones to trigger sudden sounds or lighting effects when trick-or-treaters approach. Complete the scene with tattered fabric hanging from makeshift crosses and eerie epitaphs written in dripping red paint.
Transform Your Front Porch into a Haunted Entrance
Your front porch serves as the gateway to your halloween home decor, so make it count with spine-tingling transformations. Replace your regular porch light with colored bulbs in deep purple, green, or red to cast ominous shadows across visitors’ faces. Hang thick spider webs in corners and doorways, adding oversized plastic spiders for maximum creep factor.
Create a tunnel of terror by draping black fabric or cheesecloth from your porch ceiling, leaving just enough space for trick-or-treaters to squeeze through. Add battery-operated LED lights behind the fabric to create moving shadows that suggest lurking creatures.
Position life-sized skeletons or zombies on your porch furniture, making them appear to be waiting for guests. Use fishing line to create subtle movement in hanging decorations when the wind blows. Install a doormat with motion sensors that trigger screams or spooky sounds when stepped on, giving visitors one final scare before they reach your door.
Create Moving Halloween Props Using Simple Motors
Bring your halloween yard decorations to life with motorized props that create heart-stopping moments for unsuspecting visitors. Start with a basic windshield wiper motor to create back-and-forth movements for ghostly figures or swaying skeletons. Mount these motors inside weather-resistant housings and connect them to lightweight props using sturdy wire or wooden dowels.
Design jumping spiders using small servo motors attached to spring mechanisms. Hide these DIY halloween decorations in bushes or under porch steps, programming them to activate when motion sensors detect approaching trick-or-treaters. The sudden movement combined with the element of surprise creates unforgettable scares.
Build rotating heads for your larger props using lazy Susan bearings and slow-speed motors. This technique works perfectly for cemetery angels, gargoyles, or demon figures that slowly turn to “watch” visitors as they pass by. Power these creations with extension cords hidden underground or use rechargeable batteries for wire-free operation.
Light Up Your Yard with Eerie Color-Changing Effects
Master the art of atmospheric lighting to transform your outdoor space into a haunting spectacle. LED strip lights offer endless possibilities for creating mood-setting illumination. Install color-changing strips along your walkway, programming them to shift between deep purples, sickly greens, and blood reds throughout the evening.
Project moving patterns onto your house exterior using landscape projectors with interchangeable slides. Choose designs like floating ghosts, crawling spiders, or swirling bats to create dynamic visual effects that capture attention from blocks away. Position these projectors at ground level and aim them upward for maximum coverage.
Underwater LED lights placed in clear containers create an otherworldly glow when submerged in colored water. Use green water for a toxic waste effect or red for a bloody appearance. These easy halloween decorations work perfectly when placed inside large glass bowls or clear storage containers positioned around your yard.
Build a Spooky Pathway That Guides Visitors to Your Door
Design a pathway that tells a story as trick-or-treaters make their way to your entrance. Line your walkway with luminarias made from paper bags filled with sand and battery-operated candles, cutting spooky silhouettes into each bag for dramatic light patterns. Space these halloween decoration ideas evenly to create a guided journey through your haunted landscape.
Create footprint paths using glow-in-the-dark paint or tape, making them appear to lead from your graveyard scene directly to your front door. Mix human footprints with animal paw prints or even monster claw marks to suggest various creatures have traveled this route.
Install ground-level lighting using solar stake lights wrapped in colored cellophane or tissue paper. Red lighting suggests danger, while green creates an otherworldly atmosphere. Add motion-activated sound effects at key points along the pathway – perhaps the sound of creaking doors, howling wind, or mysterious whispers that only play when someone walks by.
DIY Halloween Decorations Anyone Can Make in Under an Hour

Craft Floating Ghosts Using Cheesecloth and Wire
Transform your space into a haunted haven with floating ghosts that’ll make guests do a double-take. You’ll need cheesecloth, thin wire, fishing line, and a foam ball or balloon for the head. Start by shaping your wire into a simple armature – think of it as a skeleton for your ghost. Bend the wire to create flowing, ghostly poses that suggest movement.
Drape the cheesecloth over your wire frame, allowing it to fall naturally for that ethereal look. The key to realistic DIY halloween decorations is working with the fabric’s natural drape rather than fighting it. Secure the cheesecloth at the head with a rubber band, then fluff and adjust the fabric until you’re happy with the silhouette.
For extra spookiness, add battery-operated LED lights inside the ghost before draping the cheesecloth. This creates an otherworldly glow that works perfectly for both indoor halloween decorations and outdoor displays. Hang your ghosts at varying heights using clear fishing line to create the illusion they’re floating freely.
You can make an entire family of ghosts in under an hour – small ones for shelves, medium ones for corners, and large ones as statement pieces. The beauty of this project is that each ghost turns out unique, giving your halloween decoration ideas that authentic handmade charm.
Create Glowing Jack-o’-Lanterns Without Carving
Skip the messy carving and create stunning jack-o’-lanterns that glow beautifully without a single cut. You’ll use paint, stencils, or vinyl decals to create faces and designs on whole pumpkins. This method is perfect if you want easy halloween decorations that last longer than traditional carved pumpkins.
Start with clean, dry pumpkins and use black acrylic paint or permanent markers to draw your designs. For professional-looking results, print out face templates online and trace them onto your pumpkin. You can create everything from classic scary faces to intricate Halloween patterns.
The magic happens when you add the glow. Cut a small hole in the bottom of your pumpkin and remove the seeds through this opening. Drop in battery-operated string lights or LED candles, and your painted pumpkin transforms into a glowing masterpiece. Orange lights enhance the natural pumpkin color, while purple or green lights create an eerie effect.
For outdoor halloween decorations, these no-carve pumpkins hold up better against weather than carved ones. You can also use glow-in-the-dark paint for faces that charge up during the day and glow mysteriously at night. Make several in different sizes and group them together for maximum impact in your halloween home decor display.
Build Realistic Spider Webs That Look Store-Bought
Create convincing spider webs that’ll have people wondering if they’re real or part of your spooky halloween decorations. You’ll need white yarn or cotton batting, spray adhesive, and a few plastic spiders for authenticity. The secret to realistic webs is understanding how real spiders actually build them.
Start in a corner where two walls meet or between furniture pieces. Real spider webs have anchor points, so identify where yours will attach. Using white yarn, create the basic framework by stretching strands between your anchor points. Don’t make it too perfect – real webs have irregularities that make them look natural.
For the spiral pattern, start from the center and work outward, connecting to each radial strand. Vary the spacing between rings to avoid that obviously fake, perfectly uniform look. Once your basic structure is complete, gently pull and stretch certain sections to create the sagging, lived-in appearance of actual spider webs.
Cotton batting works wonderfully for creating thick, dusty-looking webs. Stretch small pieces and layer them over your yarn foundation, securing with tiny dots of spray adhesive. Add plastic spiders strategically – not just in the center, but also climbing along the edges where real spiders would position themselves.
For outdoor displays, use stronger materials like rope or thick twine that can withstand weather. These DIY halloween decorations work especially well in doorways, corners, and around windows where real spiders typically build their webs.

You now have everything you need to transform your home into the ultimate Halloween destination. From simple dollar-store finds that pack a visual punch to elaborate outdoor displays that’ll have neighbors talking, these 50 decoration ideas prove you don’t need a massive budget or professional skills to create something truly spectacular. The quick DIY projects can save your Halloween party when time is running short, while the advanced techniques let you push your creativity to new heights year after year.
Start with one or two ideas that excite you most, and don’t worry about doing everything at once. Halloween decorating should be fun, not stressful. Mix and match indoor and outdoor elements, combine budget-friendly basics with a few show-stopping pieces, and remember that the best Halloween displays tell a story. Your guests will remember the atmosphere you create far more than how much money you spent. So grab your craft supplies, embrace the spooky spirit, and get ready to make this Halloween your most memorable yet.